AWX Documentation
AWX Documentation
Tools:
- AWX / Ansible Tower
- Github
- minikube
- openssh (client and server)
Scope: This documentation defines the standard procedures for installing, configuring, managing, and operating AWX (Ansible Tower) to automate IT tasks such as configuration management, application deployment, patching and compliance enforcement.
Process Description:
a) Ansible Service Account Creation & Privilege Configuration :
Step1: Access the target system using an existing administrative account.
Step2: Edit the sudoers file to configure privileged access for the Ansible service account.
Step3: Grant sudo privileges to the ansibleadmin account to allow execution of administrative commands.
Step4: Verify that the ansibleadmin account can successfully execute sudo commands.
b) SSH Configuration :
Step1: Install and enable the OpenSSH server on the target systems.
Step2: Generate an SSH key pair on the Ansible Tower control node.
Step3: Copy the public SSH key to the target systems to enable passwordless authentication.
Step4: Verify SSH connectivity between the control node and the target systems.
c) Playbook Management (GitHub / GitLab) :
Step1: Create the required Ansible playbook for the wallpaper policy.
Step2: Upload and maintain the playbook in the approved Git repository (GitHub/GitLab).
Step3: Configure the Git repository as a project source in Ansible Tower.
Step4: Synchronize the project in Ansible Tower to fetch the latest playbook version.
d) Policy Deployment (Wallpaper Policy) :
Step1: Define the target systems (hosts) in Ansible Tower by adding the required servers that will receive the wallpaper policy.
Step2: Group the target systems into an inventory to logically organize and manage the systems where the policy will be applied.
Step3: Configure access credentials to allow Ansible Tower to securely connect to the target systems for automation activities.
Step4: Create a job template by selecting the inventory (target systems), project (playbook source), wallpaper policy playbook, and the required access credentials.
Step5: Execute the job template to deploy the wallpaper policy to the selected target systems.
Step6: Monitor the job execution status through the Ansible Tower interface and review the execution output for any errors or failures.
Step7: Verify that the wallpaper policy has been successfully applied by confirming the job completion status and visually validating the wallpaper on the target systems.
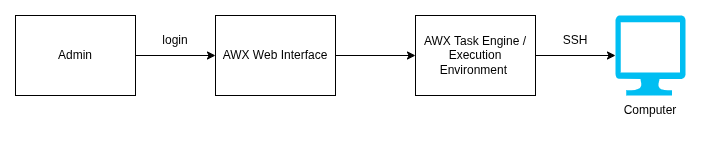
High Level Process Diagram
Process
a) Ansible Service Account Creation & Privilege Configuration :
Step1: Access the target system using an existing administrative account.
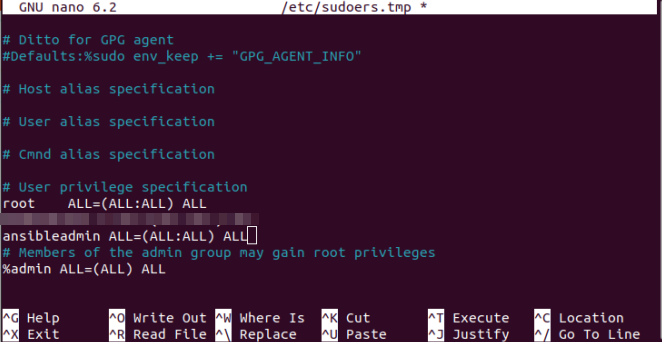
Step2: Grant sudo privileges to ansibleadmin by editing the sudoers file: sudo visudo
Step3: Add the following line under # User privilege specification: ansibleadmin ALL=(ALL:ALL) ALL
Step4: Verify that ansibleadmin can run sudo commands: su - ansibleadmin, sudo ansibleadmin and check whoami
b) SSH Configuration :
Step1 : Install and enable the OpenSSH server on the target systems.
i. Verify if OpenSSH Server is Installed dpkg -l | grep openssh-server
ii. If it is not installed install Openssh by following commands :
sudo apt update
sudo apt install -y openssh-server
iii. Start and Enable SSH service :
sudo systemctl start sshd
sudo systemctl enable sshd
sudo systemctl status sshd
iv. Verify SSH access
v. From another machine (or the control node), run: ssh ansibleadmin@target_system_ip
Step2 : Generate an SSH key pair on the Ansible Tower control node.
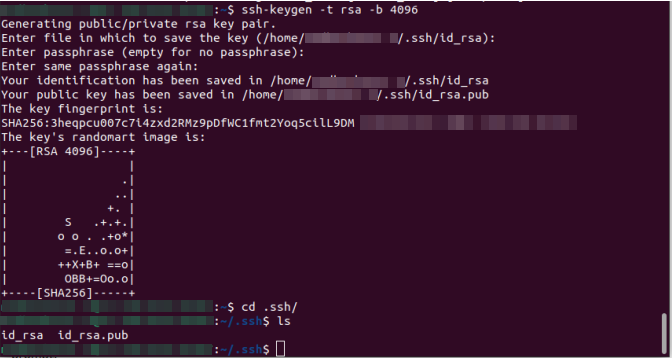
i. On the control node, generate an SSH key pair: ssh-keygen -t rsa -b 4096 -f ~/.ssh/id_rsa_ansible
Step 3 : Copy the public SSH key to the target systems to enable passwordless authentication.
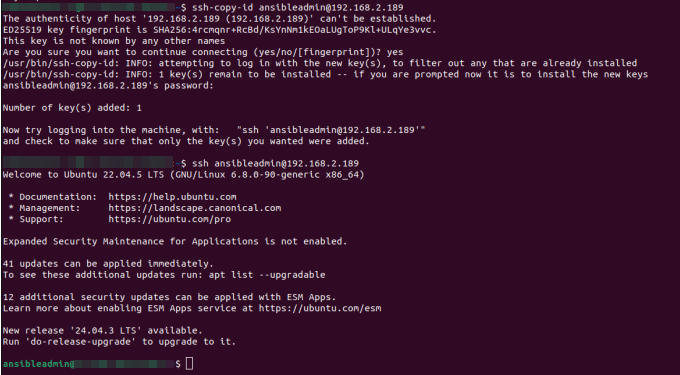
i. Copy the public key to the target system: ssh-copy-id ansibleadmin@target_system_ip
Step 4 : Verify SSH connectivity between the control node and the target systems.
i. Test passwordless SSH: ssh ansibleadmin@target_system_ip
c) Ansible Tower (AWX) Installation and Configuration
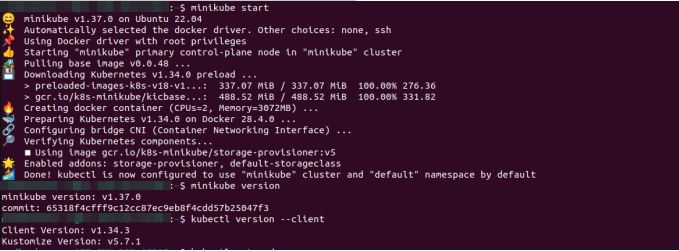
Step 1 : Install and configure Minikube on the control node.
i. Log in to the control node with administrative privileges.
ii. Download the Minikube binary.
curl -LO https://storage.googleapis.com/minikube/releases/latest/minikube-linux-amd64
iii.Install the Minikube binary and remove the downloaded file.
sudo install minikube-linux-amd64 /usr/local/bin/minikube
rm -f minikube-linux-amd64
iv. Verify the Minikube installation. minikube version
v. Start Minikube using the required driver. minikube start
Step 2 : Install kubectl on the Control Node
i. Download the latest stable version of kubectl.
curl -LO "https://dl.k8s.io/release/$(curl -L -s https://dl.k8s.io/release/stable.txt)/bin/linux/amd64/kubectl"
ii.Install kubectl with appropriate permissions. install -o root -g root -m 0755 kubectl /usr/local/bin/kubectl
iii.Verify the kubectl installation.
kubectl version --client
Step 3 : Deploy the AWX Operator in the Minikube Environment
i. Clone the AWX Operator repository
1
git clone https://github.com/ansible/awx-operator.git
ii.Navigate to the AWX Operator directory.
1
cd awx-operator/
iii.Check out the required AWX Operator version.
1
git checkout 2.19.1
iv.Set the namespace for AWX deployment.
1
export NAMESPACE=awx
v.Deploy the AWX Operator.
1
make deploy
vi.Create the AWX instance using the provided configuration file.
1
kubectl create -f awx-demo.yml -n awx
Step 4 : Verify AWX Pods and Services
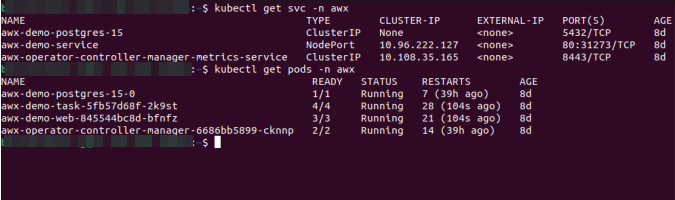
i.Verify that all AWX-related pods are running.
1
kubectl get pods -n awx
ii.Verify that the required services are created.
1
kubectl get svc -n awx
Step 5 : Access and Validate Ansible Tower (AWX)
i.Retrieve the AWX service URL using Minikube.
1
minikube service awx-demo-service --url -n awx
ii.Open the retrieved URL in a web browser.
iii.Log in to the Ansible Tower (AWX) web interface using the default or configured credentials.
Step 6 : Change the AWX Admin Password
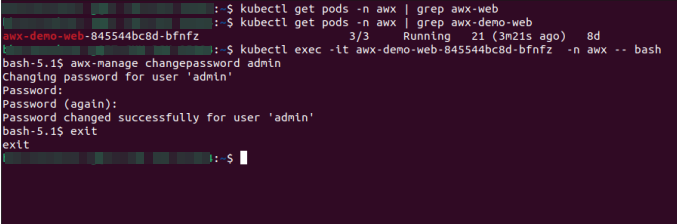
i.Identify the AWX web pod name.
1
kubectl get pods -n awx | grep awx-demo-web
ii.Access the AWX web pod.
1
kubectl exec -it <awx-web-podname> -n awx -- bash
iii.Change the admin password.
1
awx-manage changepassword admin
iv.Exit from the pod shell.
1
exit
Step 7 : Validate Ansible Tower Operation
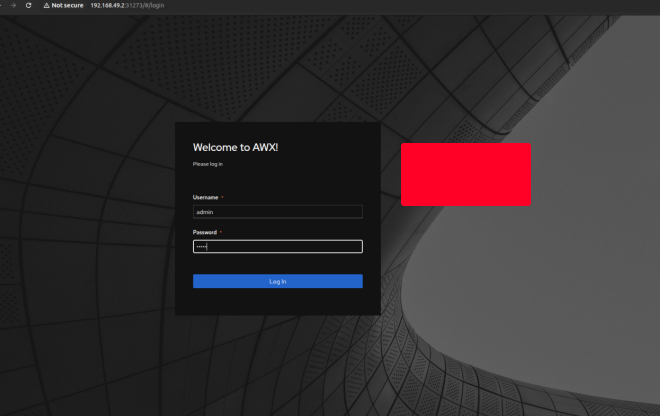
i. Log in to the Ansible Tower web interface using the updated admin password.
ii. Confirm that the dashboard loads successfully.
iii. Execute a test job template to validate connectivity and execution.
iv. Review job logs and confirm successful completion.
d) Playbook Management (GitHub / GitLab) :
Step 1 : Create the Ansible Playbook for the Wallpaper Policy
i.Log in to the control node or development system.
ii.Create a new Ansible playbook file for the wallpaper policy.
iii.Define the required tasks to copy the wallpaper file and enforce the configuration on target systems.
iv.Validate the playbook syntax and logic locally.
Step 2 : Upload and Maintain the Playbook in the Git Repository
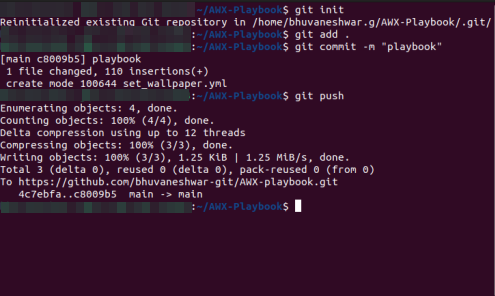
i.Create or use an approved Git repository in GitHub or GitLab.
ii.Add the wallpaper policy playbook to the repository.
iii.Commit the changes with an appropriate message
iv.Push the playbook to the central Git repository.
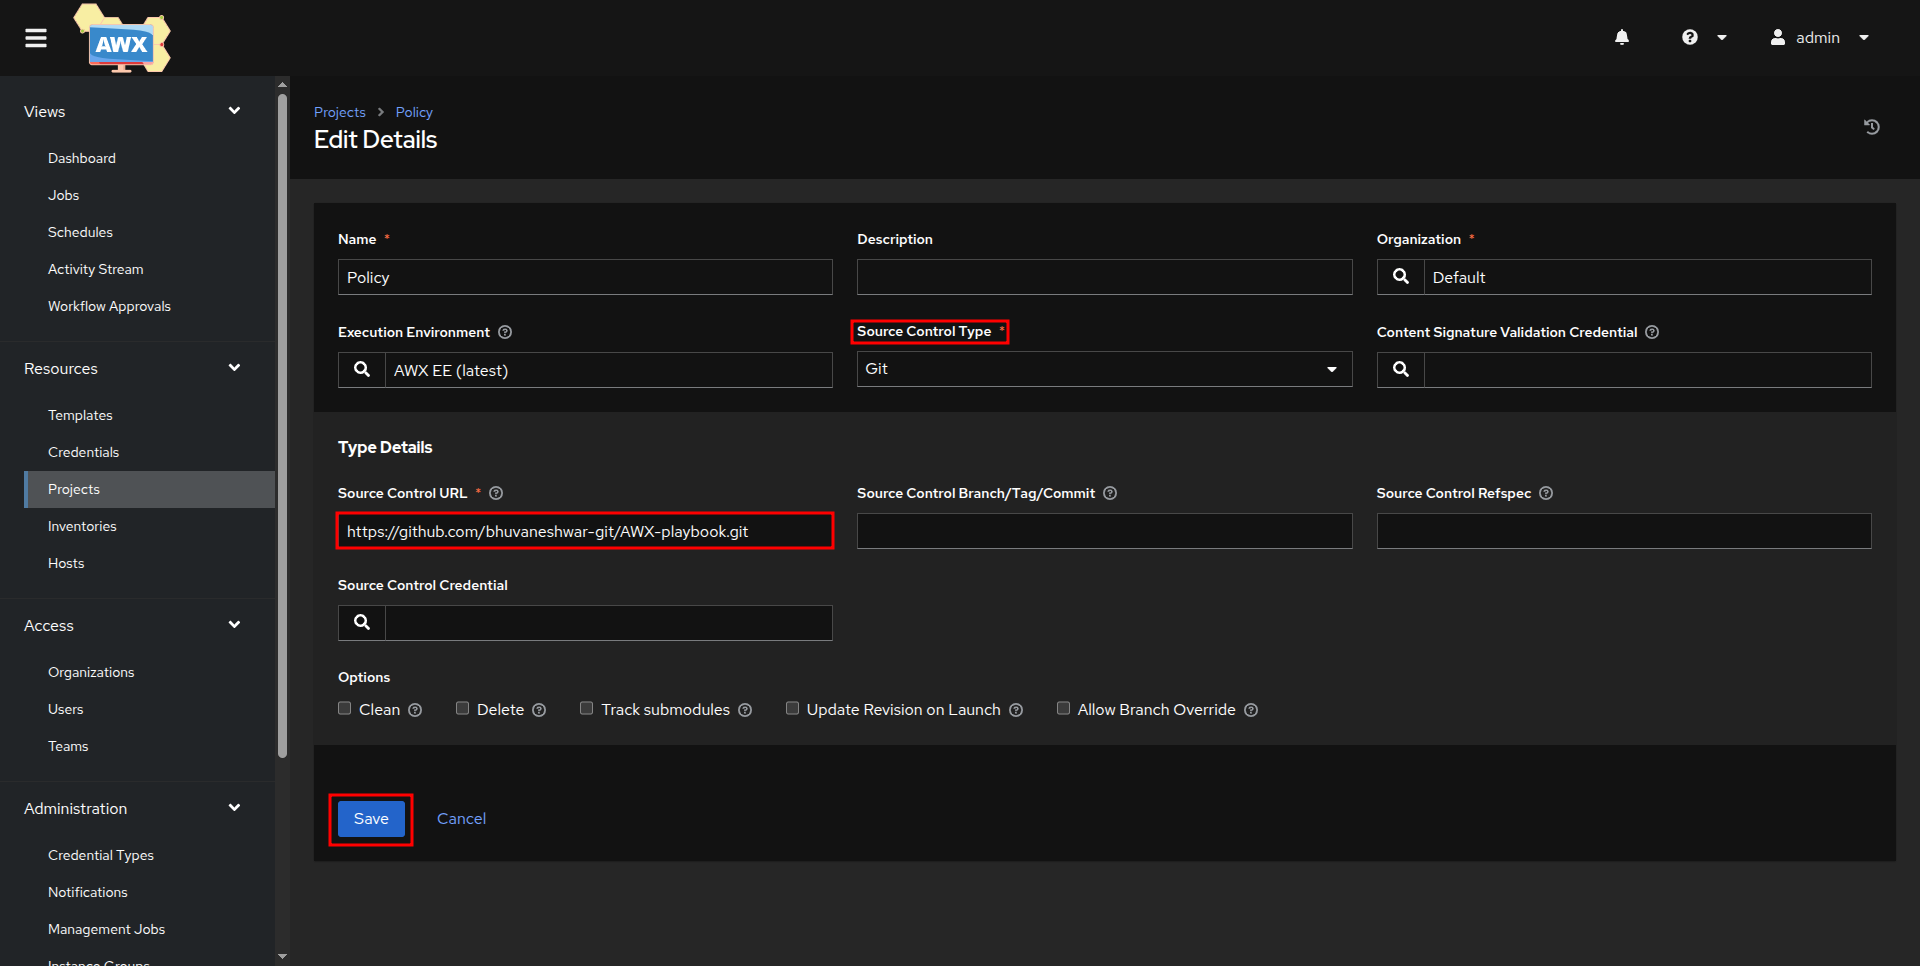
Step 3 : Configure the Git Repository as a Project Source in Ansible Tower
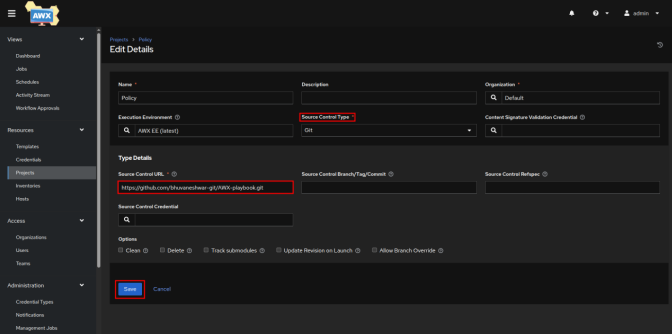
i.Log in to the Ansible Tower (AWX) web interface.
ii.Navigate to Projects and create a new project.
iii.Select Git as the source control type.
iv.Provide the Git repository URL and required authentication details.
Step 4 : Synchronize the Project in Ansible Tower
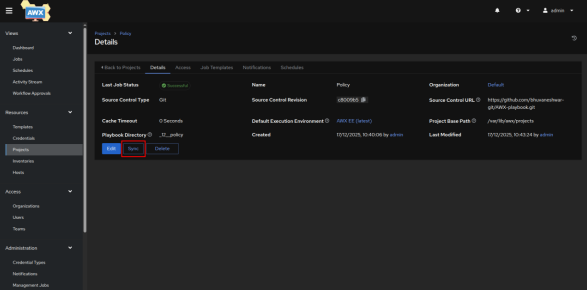
i.Initiate a project synchronization in Ansible Tower.
ii.Monitor the synchronization status and logs.
iii.Confirm that the latest version of the playbook is successfully fetched.
iv.Verify the availability of the playbook for job template creation.
e)Policy Deployement
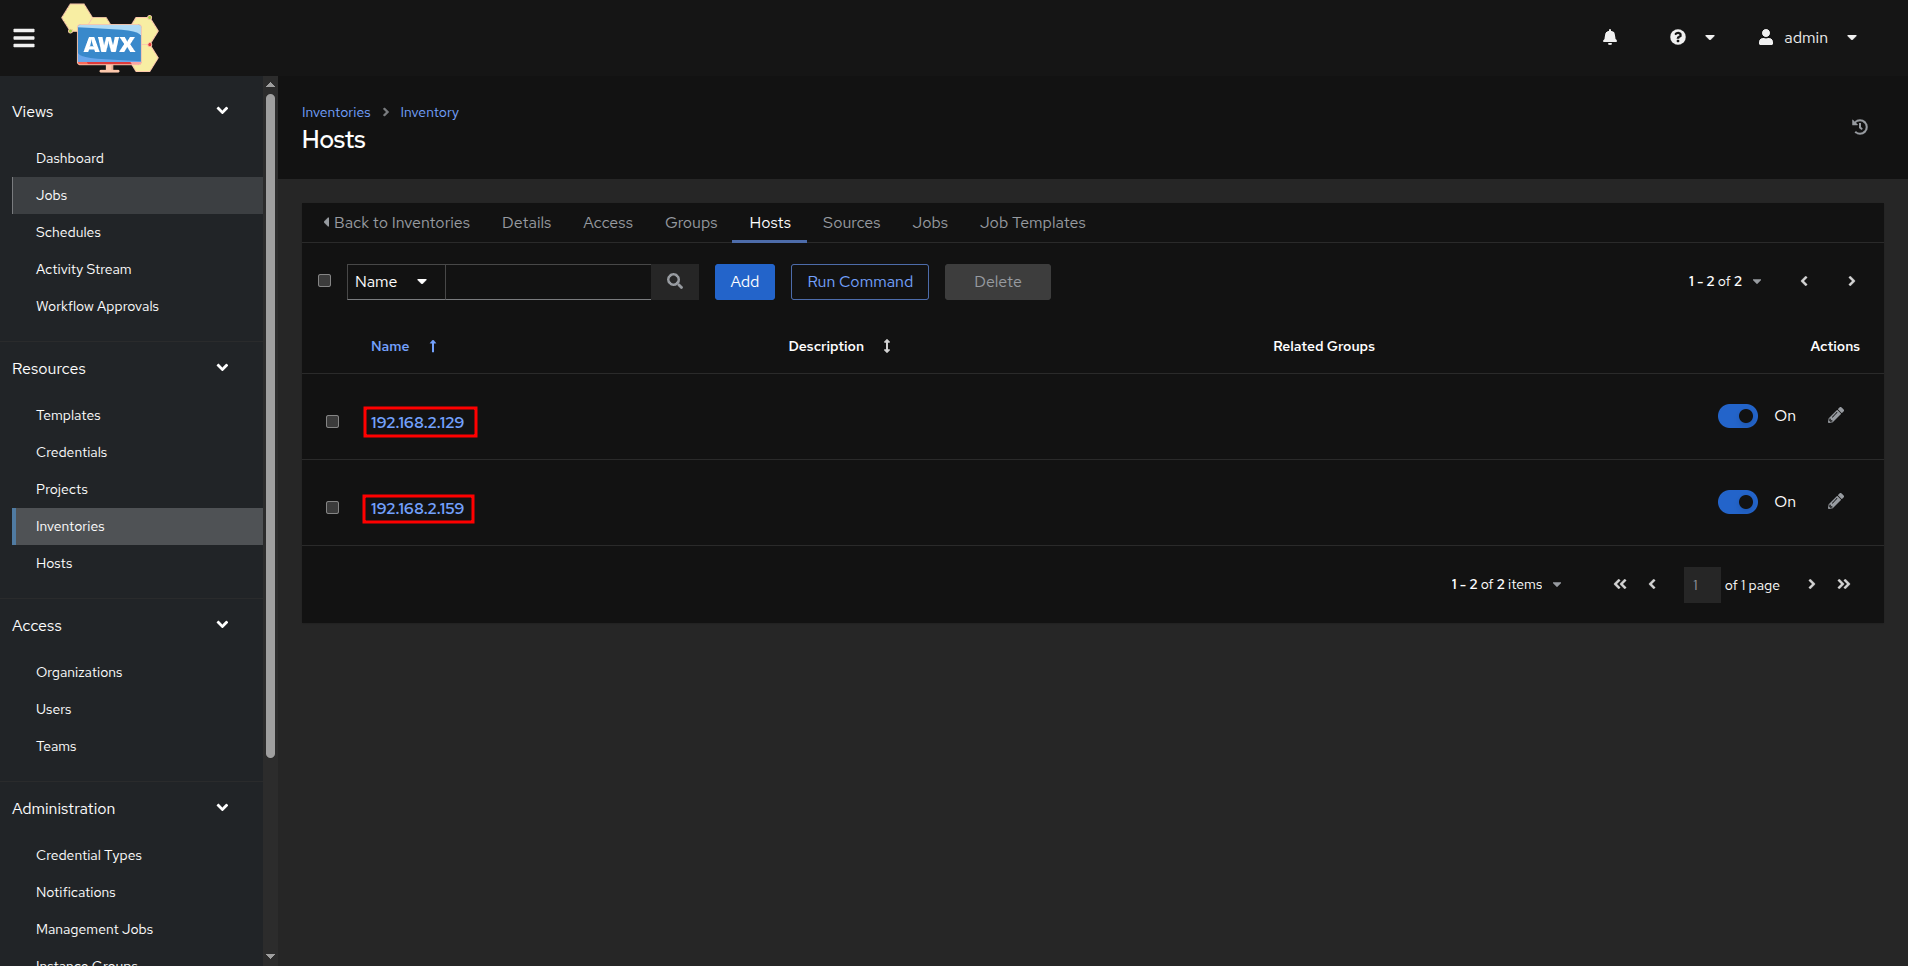
Step 1 : Define the target systems (hosts) in Ansible Tower by adding the required servers that will receive the wallpaper policy.
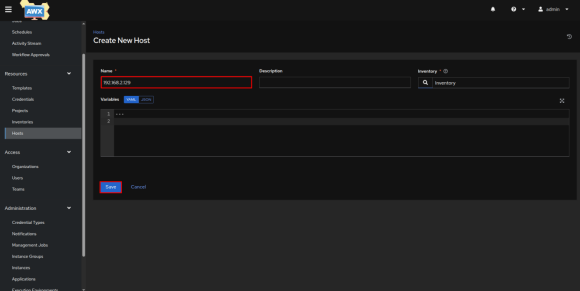
i. Log in to the Ansible Tower (AWX) web interface.
ii. Navigate to Resources → Hosts.
iii. Click Add to register a new target system.
iv. Enter the required details such as: IP address
v. Save the host
Step 2 : Create and Configure Inventory
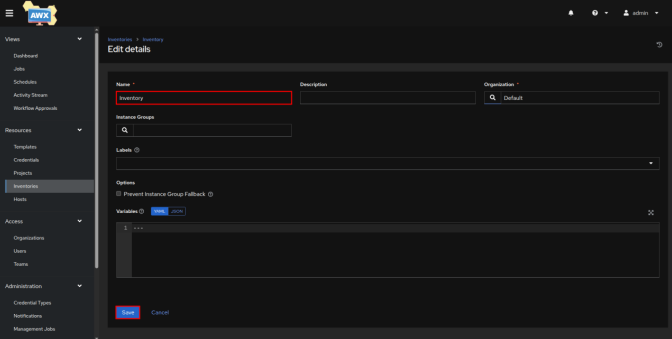
i.Navigate to Resources → Inventories.
ii.Click Add to create a new inventory.
iii.Provide an inventory name that represents the target systems
iv.Save the inventory.
v.Confirm that all required target systems are listed under the inventory.
Step 3 : Configure Access Credentials
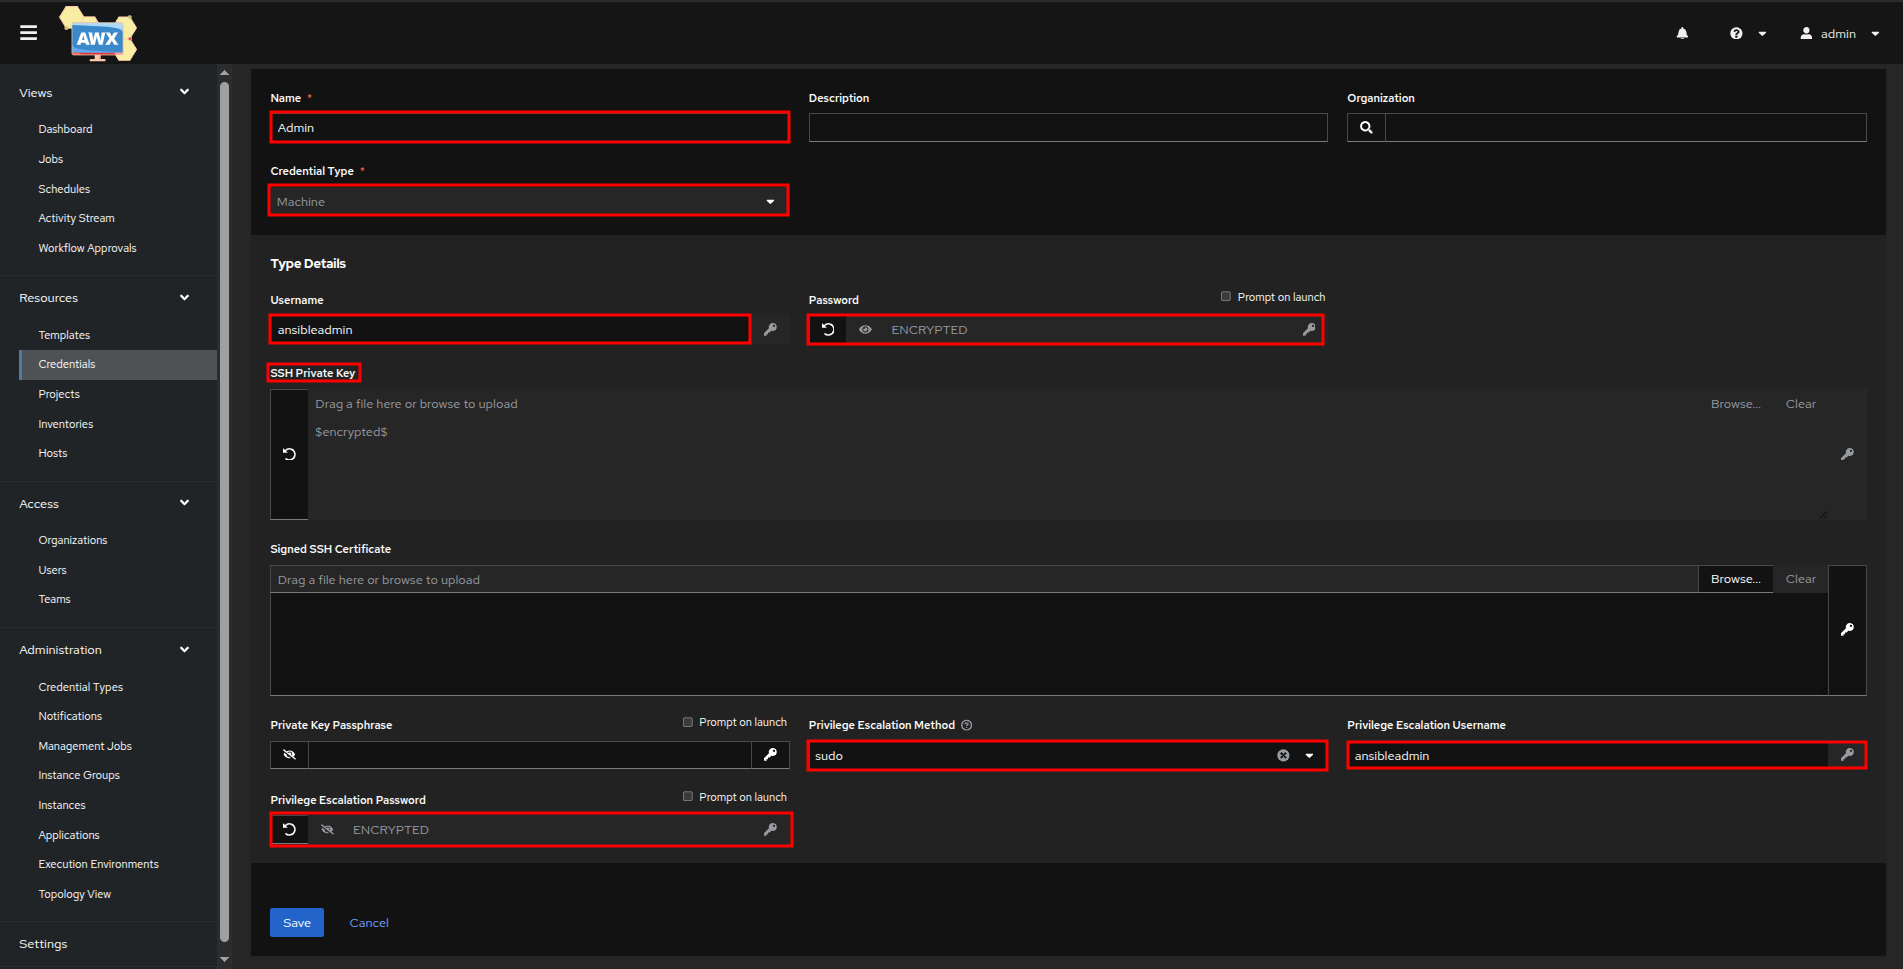
i.Navigate to Resources → Credentials.
ii.Click Add to create a new credential.
iii.Select the appropriate credential type (for example: Machine).
iv.Under Type Details, enter the following information: Username: ansibleadmin Password:
v.In the SSH Private Key field:
-
Upload or paste the private SSH key associated with the ansibleadmin account.
-
This key enables secure, passwordless SSH access to the target systems.
vi. Configure Privilege Escalation settings:
-
Privilege Escalation Method: Select sudo
-
Privilege Escalation Username: ansibleadmin
-
Privilege Escalation Password:
-
Click Save to store the credential.
Step 4 : Synchronize the Project (Playbook Source)
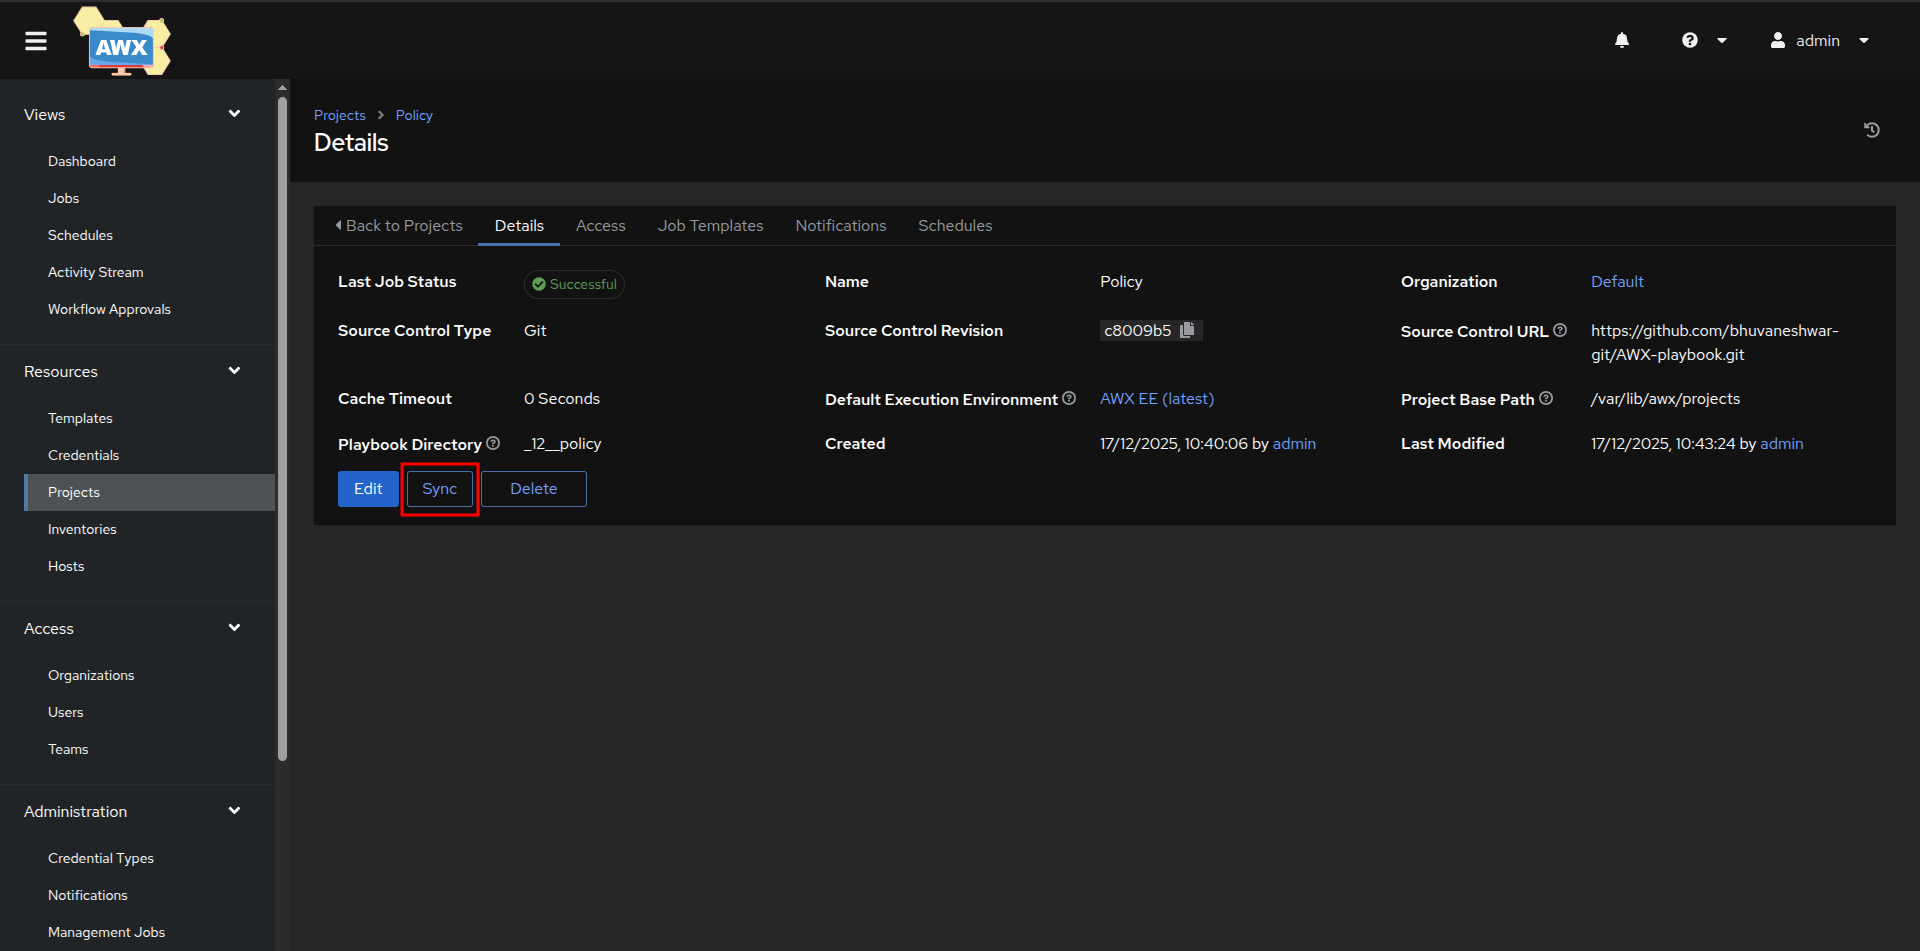
i.Navigate to Resources → Projects.
ii.Select the approved project linked to the GitHub or GitLab repository.
iii.Click Sync to fetch the latest version of the wallpaper policy playbook.
iv.Verify that the synchronization completes successfully.
Step 5 : Create a Job Template
i. Navigate to Resources → Templates.
ii. Click Add → Job Template.
iii. Provide a name for the template
iv. Select:
-
The inventory containing the target systems
-
The wallpaper policy playbook
-
The required access credential
-
Execution encirnoment as AWX EE (latest)
-
Credentials SSh:Admin
-
Verbosity as 2
-
Enable Privilege Escalation
v. Save the job template.
Step 6 : Execute the Job Template
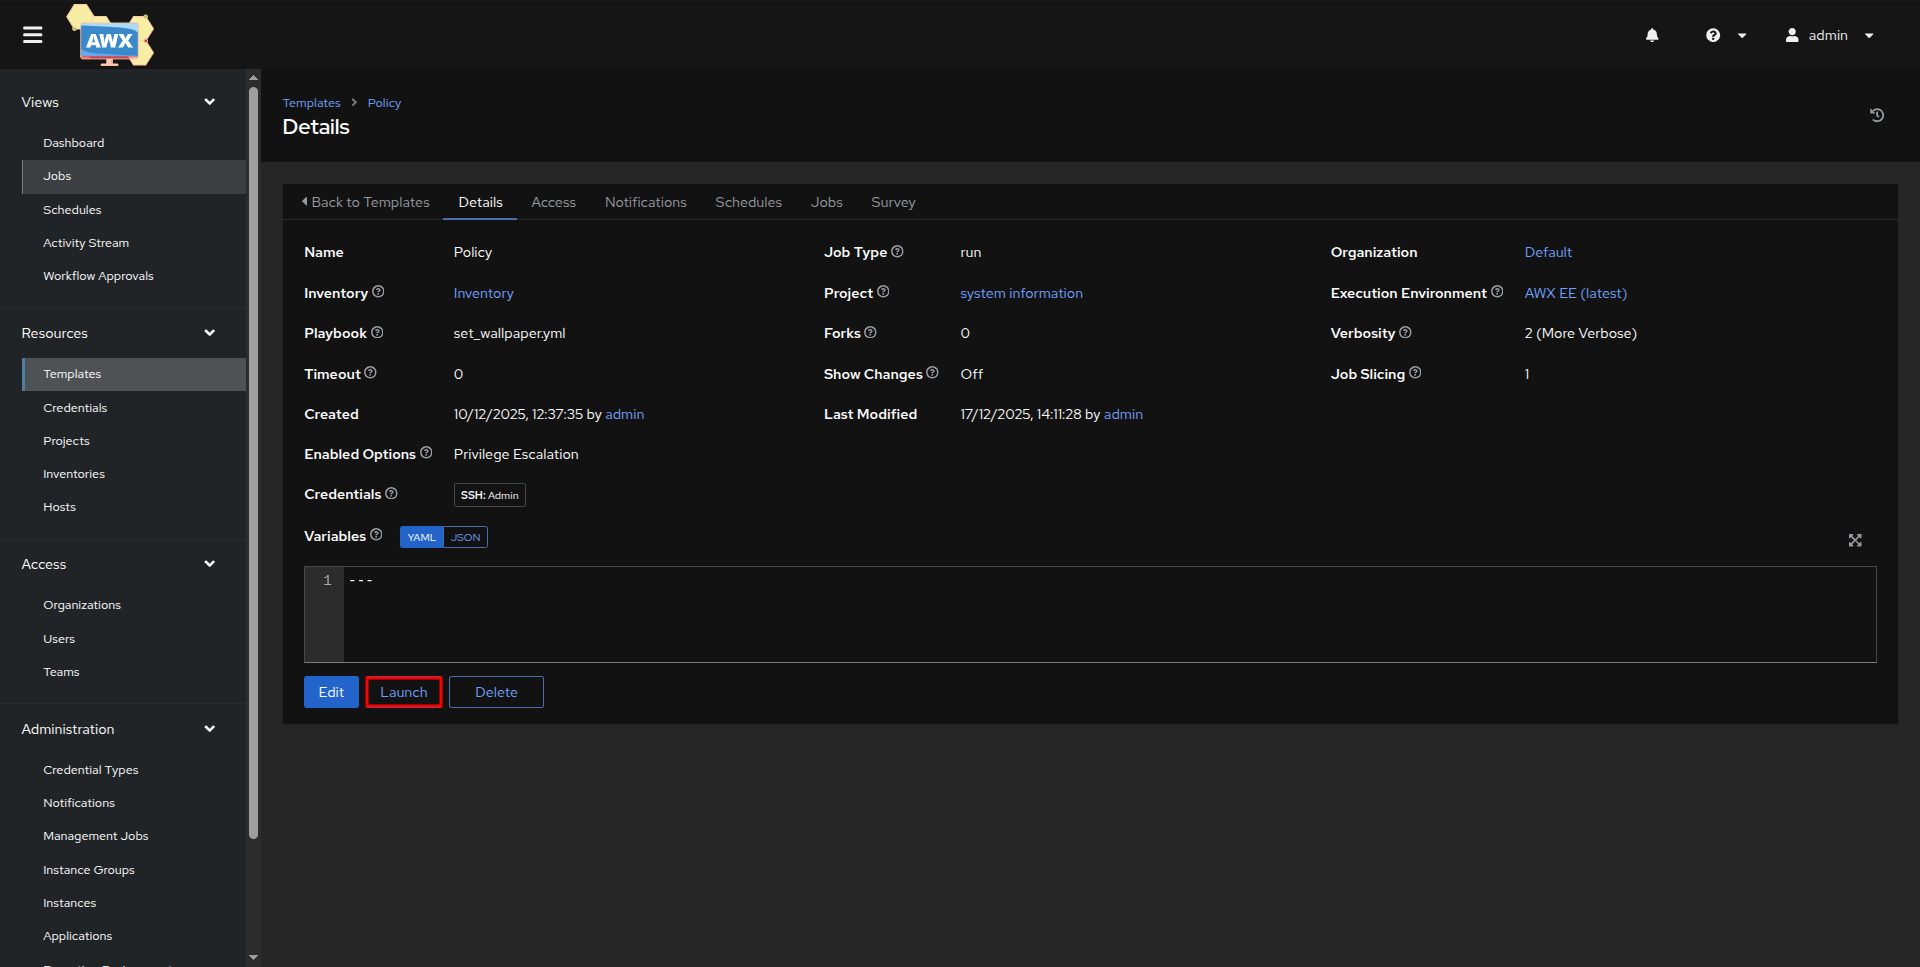
i. Locate the created job template in the Templates list.
ii. Click Launch to start the policy deployment.
iii. Ansible Tower begins executing the playbook on the selected target systems.
Step 7: Monitor Job Execution and Logs
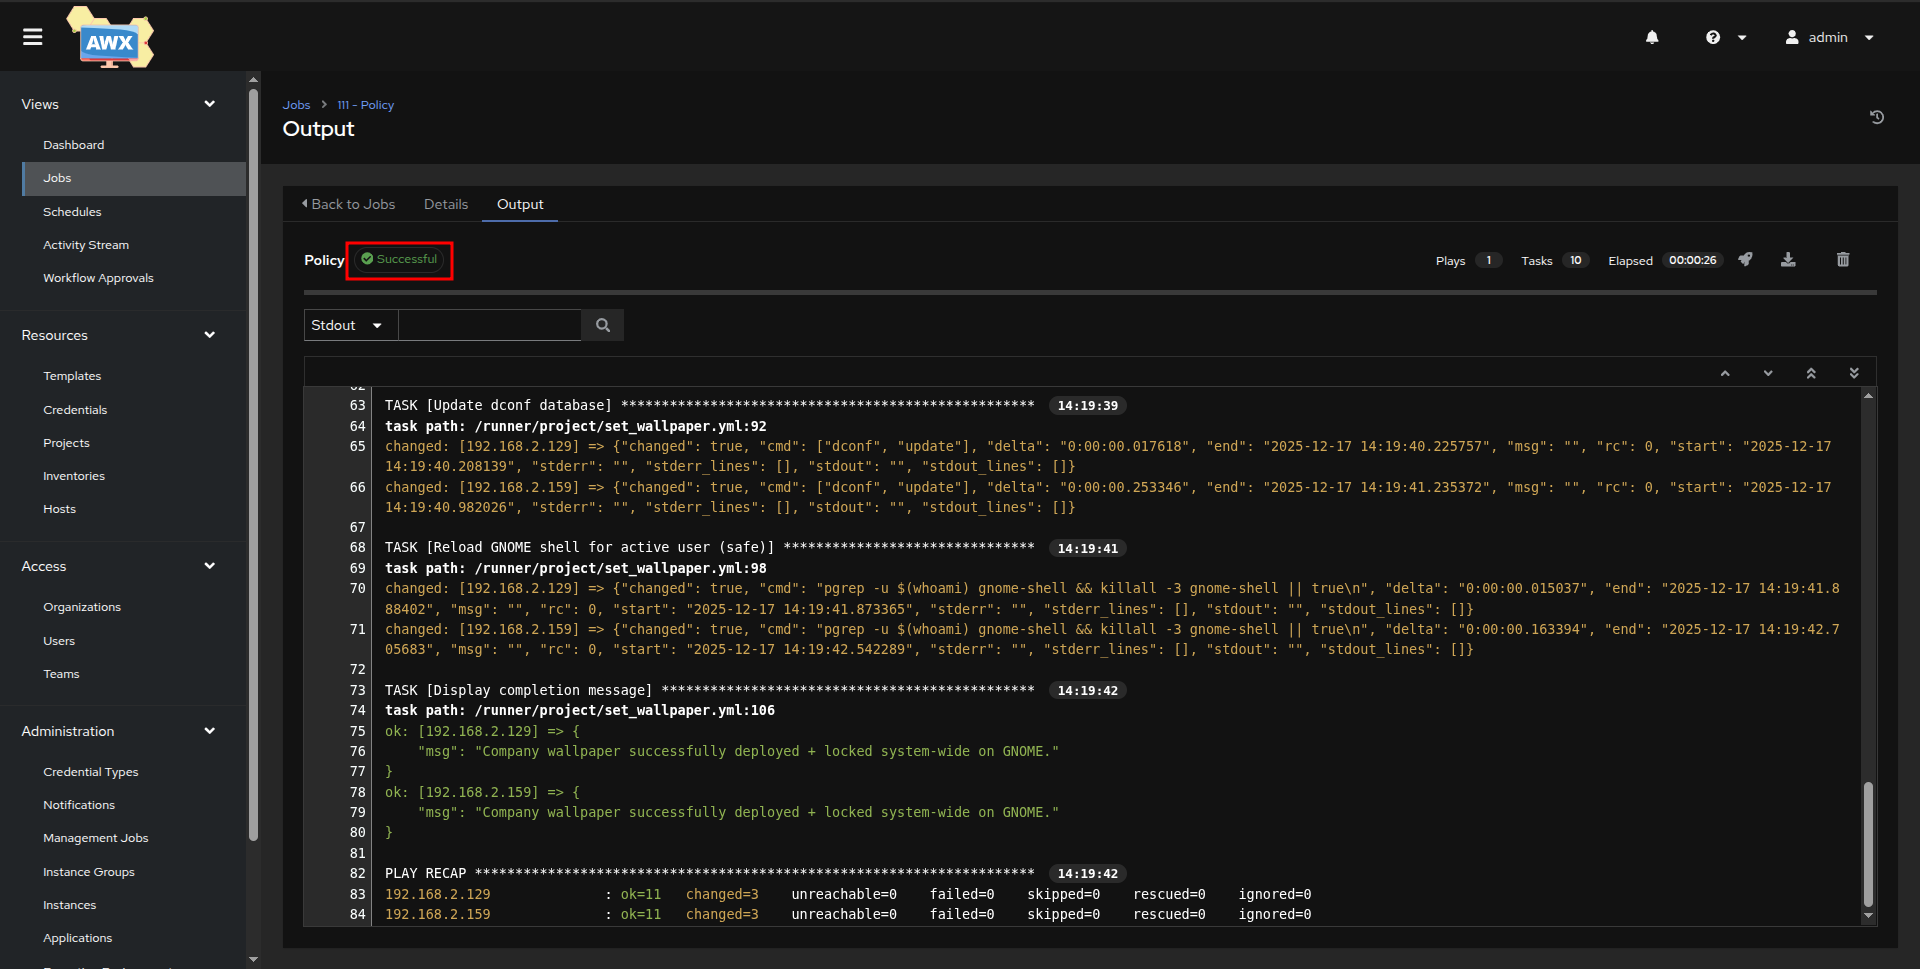
i. Monitor the job progress in real time from the job output screen.
ii. Review task execution messages to ensure steps are completed successfully.
iii. If any errors occur, review the displayed logs to identify the cause.
iv. Confirm that the job status completes successfully.
Step 8 : Verify Policy Deployment
i. Log in to one or more target systems.
ii. Confirm that the wallpaper has been updated as per the defined policy.
iii. Ensure the wallpaper remains applied after user login or system restart, if applicable.
iv. Record the successful deployment for audit and compliance purposes.